A report of each inspection and test shall be kept by the owner of the IBC at least until the next
inspection or test. The report shall include the results of the inspection and test and shall identify the
party performing the inspection and test (see also the marking requirements in 6.5.2.2.1).
The competent authority may at any time require proof, by tests in accordance with this Chapter, that
IBCs meet the requirements of the design type tests.
Repaired IBCs
When an IBC is impaired as a result of impact (e.g. accident) or any other cause, it shall be repaired or
otherwise maintained (see definition of "Routine maintenance of IBCs" in 1.2.1), so as to conform to
the design type. The bodies of rigid plastics IBCs and the inner receptacles of composite IBCs that are
impaired shall be replaced.
In addition to any other testing and inspection requirements in ADR, an IBC shall be subjected to the
full testing and inspection requirements set out in 6.5.4.4, and the required reports shall be prepared,
whenever it is repaired.
The Party performing the tests and inspections after the repair shall durably mark the IBC near the
manufacturer's UN design type marks to show:
(a) The State in which the tests and inspections were carried out;
(b) The name or authorized symbol of the party performing the tests and inspections; and
(c) The date (month, year) of the tests and inspections.
Test and inspections performed in accordance with 6.5.4.5.2 may be considered to satisfy the
requirements for the two and a half and five year periodic tests and inspections.
Specific requirements for IBCs
Specific requirements for metal IBCs
These requirements apply to metal IBCs intended for the carriage of solids and liquids. There are three
categories of metal IBCs:
(a) Those for solids which are filled or discharged by gravity (11A, 11B, 11N);
(b) Those for solids which are filled or discharged at a gauge pressure greater than 10 kPa (0.1 bar)
(21A, 21B, 21N); and
(c) Those for liquids (31A, 31B, 31N).
Bodies shall be made of suitable ductile metal in which the weldability has been fully demonstrated.
Welds shall be skilfully made and afford complete safety. Low-temperature performance of the
material shall be taken into account when appropriate.
Care shall be taken to avoid damage by galvanic action due to the juxtaposition of dissimilar metals.
Aluminium IBCs intended for the carriage of flammable liquids shall have no movable parts, such as
covers, closures, etc., made of unprotected steel liable to rust, which might cause a dangerous reaction
by coming into frictional or percussive contact with the aluminium.

Minimum wall thickness:
(a) for a reference steel having a product of Rm Ao = 10 000, the wall thickness shall not be less than:
|
Capacity (C) in litres
|
Wall thickness (T) in mm
|
|
Types 11A, 11B, 11N
|
Types 21A, 21B, 21N, 31A, 31B, 31N
|
|
Unprotected
|
Protected
|
Unprotected
|
Protected
|
|
C 1000
|
2.0
|
1.5
|
2.5
|
2.0
|
|
1000 < C 2000
|
T = C/2000 + 1.5
|
T = C/2000 + 1.0
|
T = C/2000 + 2.0
|
T = C/2000 + 1.5
|
|
2000 < C 3000
|
T = C/2000 + 1.5
|
T = C/2000 + 1.0
|
T = C/1000 + 1.0
|
T = C/2000 + 1.5
|
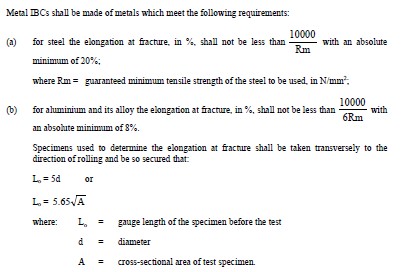
where: Ao = minimum elongation (as a percentage) of the reference steel to be used on fracture under tensile stress (see 6.5.5.1.5);
(b) for metals other than the reference steel described in (a), the minimum wall thickness is given by the following equivalence formula:

where: e1 = required equivalent wall thickness of the metal to be used (in mm);
e0 = required minimum wall thickness for the reference steel (in mm);
Rm1 = guaranteed minimum tensile strength of the metal to be used (in N/mm2)
(see (c));
A1 = minimum elongation (as a percentage) of the metal to be used on fracture
under tensile stress (see 6.5.5.1.5).
However, in no case shall the wall thickness be less than 1.5 mm.
(c) For purposes of the calculation described in (b), the guaranteed minimum tensile strength of
the metal to be used (Rm1) shall be the minimum value according to national or international
material standards. However, for austenitic steels, the specified value for Rm according to the
material standards may be increased by up to 15% when a greater value is attested in the
material inspection certificate. When no material standard exists for the material in question,
the value of Rm shall be the minimum value attested in the material inspection certificate.


